Intercepting and Decrypting iOS communications
Overview
Ever wondered how you can view the network communications between the apps on your iPhone and the internet - me too, let’s have a look.
Goals
There are two things I’d like to do
- Intercept the network communications
- Decrypt the communications so I can see what they’re doing
Intercepting Network Communications
We somehow need to inject an intermediary between the phone and the internet that can accept the network communications, and forward the traffic to the intended recipients.
That intermediary is called a proxy - cool, 1 down ✔️
Decrypting Communications
For this one we need to be able to generate SSL certificates for the domains with which the applications are trying to communicate.
By doing this, we own the private key associated with the certificate, and are able to decrypt and view the communications before re-encrypting it with the real public key, and passing it on the the intended recipient.
All SSL certificates are created by a Certificate Authority or CA, so we’re going to need one of those.
Crucially, trust is very important, the operating system will only trust limited number of verified CA’s, and this list is automatically maintained by Apple for iOS.
Fortunately, having physical access to the device means we can tell the operating system to trust our custom Certificate Authority ✔️
Okay okay, show me how
Some quick Googling led me to an open source, cross platform project named mitmproxy that meets all my requirements above.
To get everything up and running, we’re going to need to start the proxy, and then do some configuration on the phone.
Starting mitmproxy
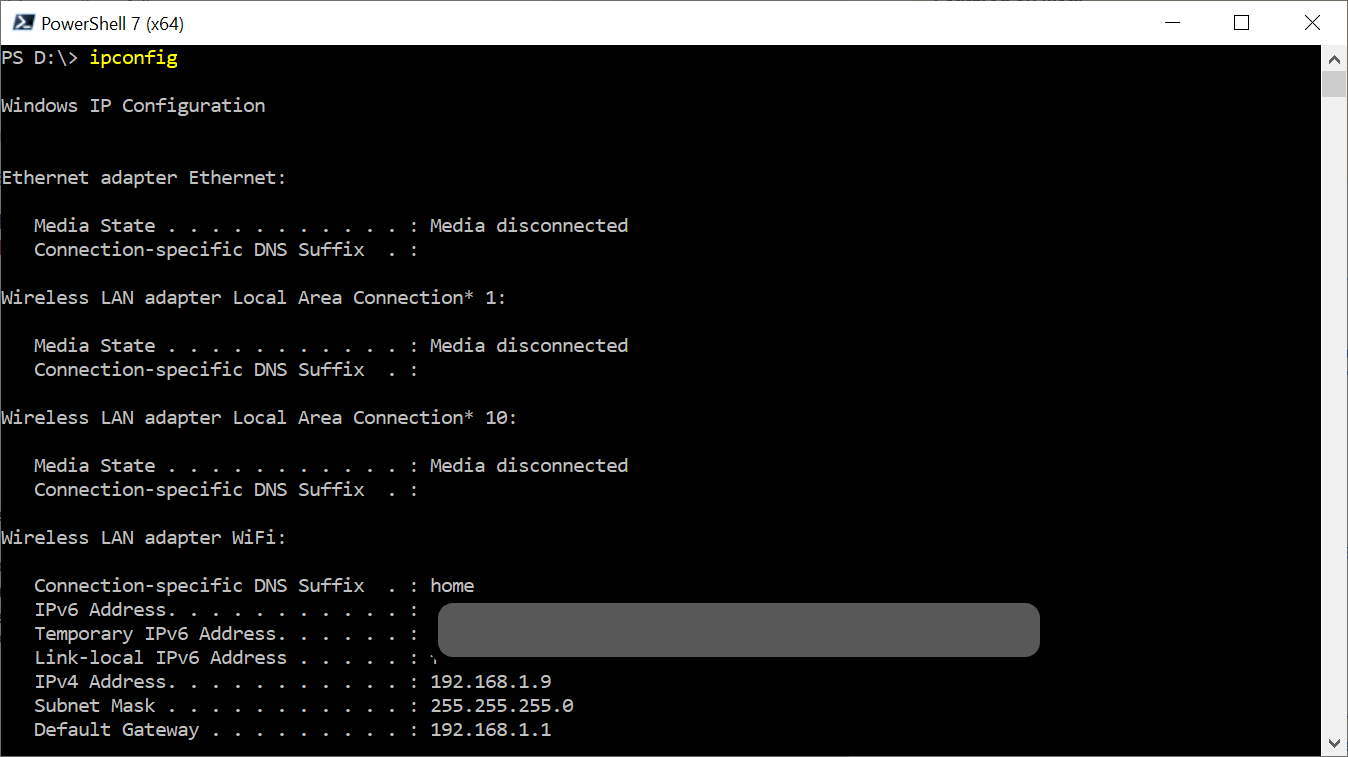
This part is super easy, but first, let’s take note of the IP address we’re going to need to configure the phone.
For Windows, open Terminal, or PowerShell or a command prompt and run this command.
|
|
The result should look something like this - Note down the IPv4 Address associated with your WiFi adapter - in my case, that is 192.168.1.9
I chose to use the official docker variant of mitmproxy.
To get this up and running, run the following docker command.
|
|
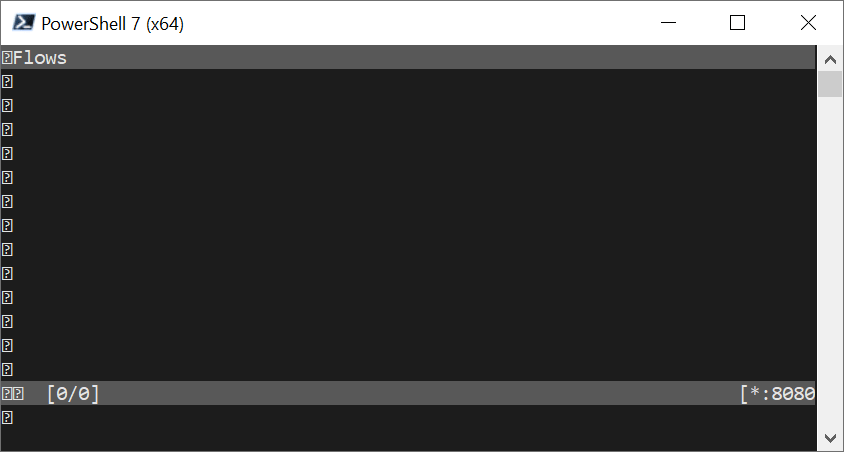
This will start mitmproxy using the docker interactive mode, and bind it to port 8080.
If you see this, you’re good to go - and we’re done starting mitmproxy - Do not close the window.
iOS configuration
The following will all be done on your phone.
It’s a bit of a pain, but is also fairly easy.
The overall steps are:
- Configure iOS to use our new proxy (mitmproxy)
- Install a custom profile
- Tell iOS to trust our custom Certificate Authority
Proxy Configuration
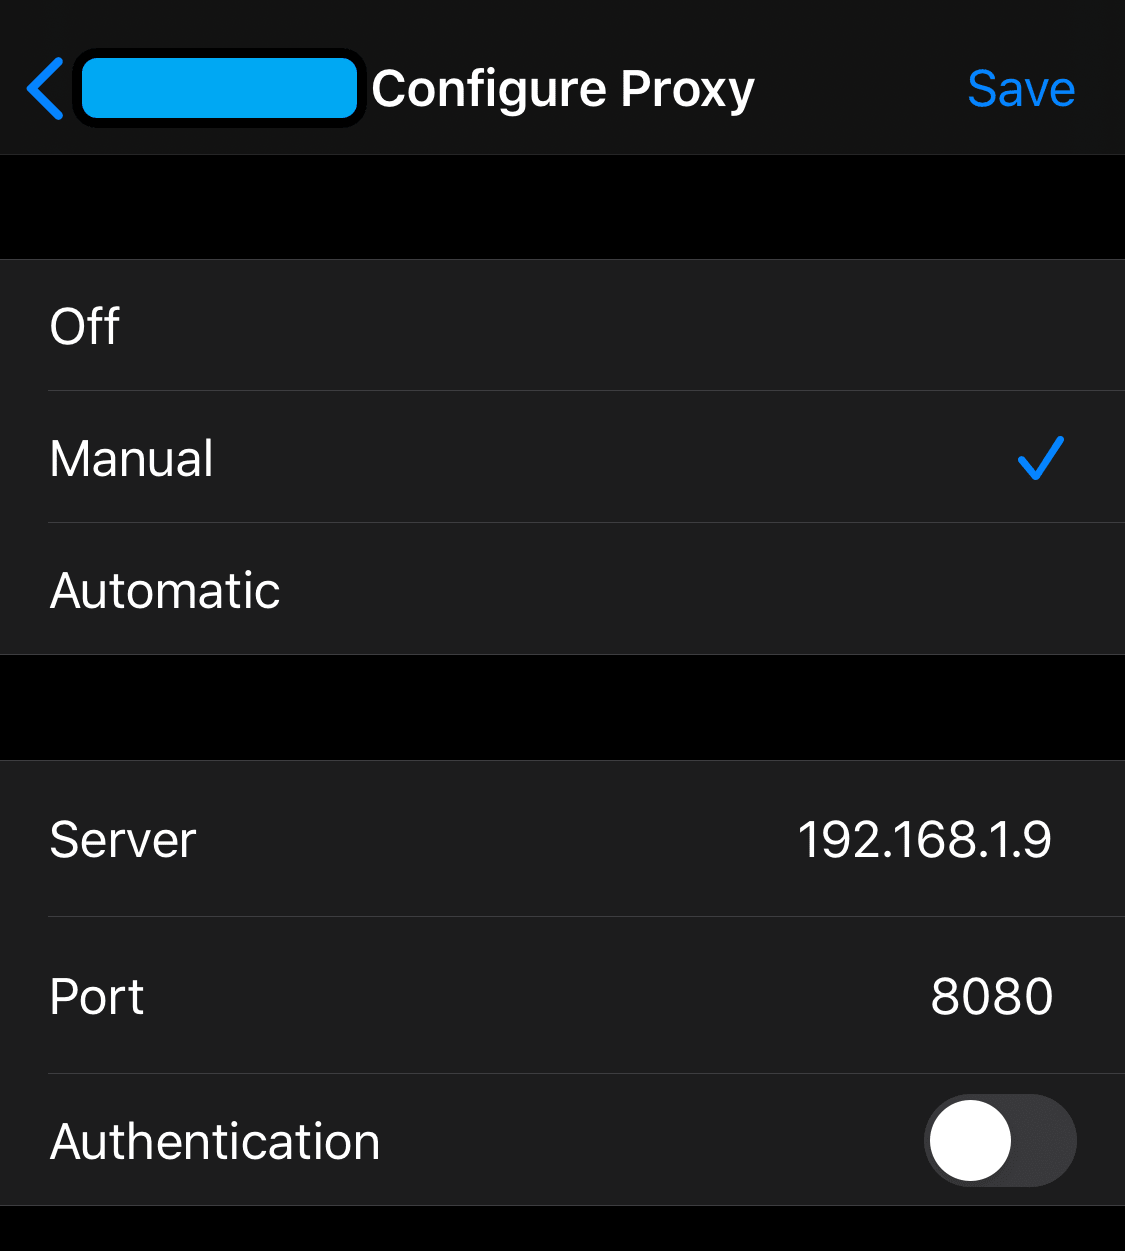
- Navigate to
Settings/Wi-Fiand tap on the blue circledion the right. - Scroll to the bottom, and tap on
Configure Proxy - Select
Manualand enter the the IP configuration we noted earlier, and enter8080as the port - Save
Here is mine for reference
That’s it for the proxy configuration, but lets see what its done.
If you open Safari, and navigate to https://abc.net.au - you should see something like this.
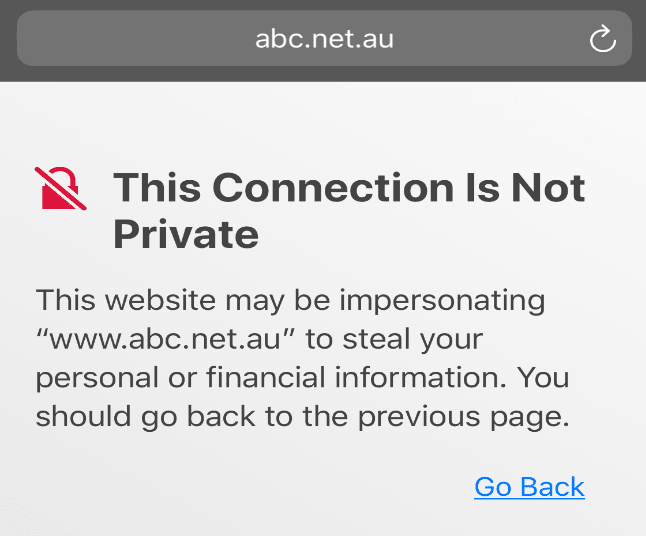
The warning is telling us that there is something wrong with the SSL certificate for this website.
This is entirely expected becuase the certificate was generated by an untrusted Certificate Authority - the mitmproxy.
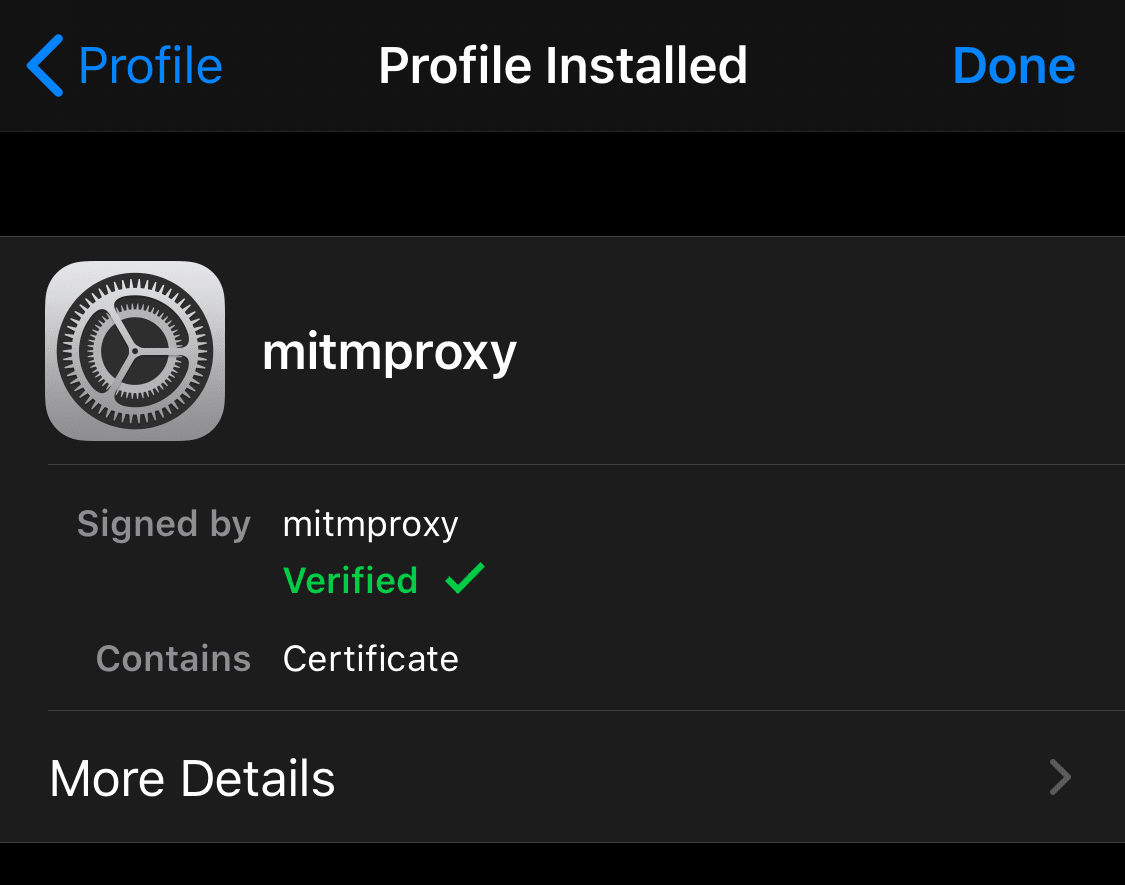
Install a custom profile
- Open Safari
- Navigate to http://mitm.it
- Tap on the Apple option
- Select
Allowfor the prompt, and select your iPhone device if prompted - Navigate to
Settings/General/Profiles - Tap the mitmproxy profile, and follow the prompts to install and enable the profile.
The result should look like this.
Trust the custom Certificate Authority
Okay, last stretch
- Navigate to
Settings/General/About - Scroll to the bottom and tap
Certificate Trust Settings - Enable the mitmproxy root certificate, and accept the prompts
You should get to this

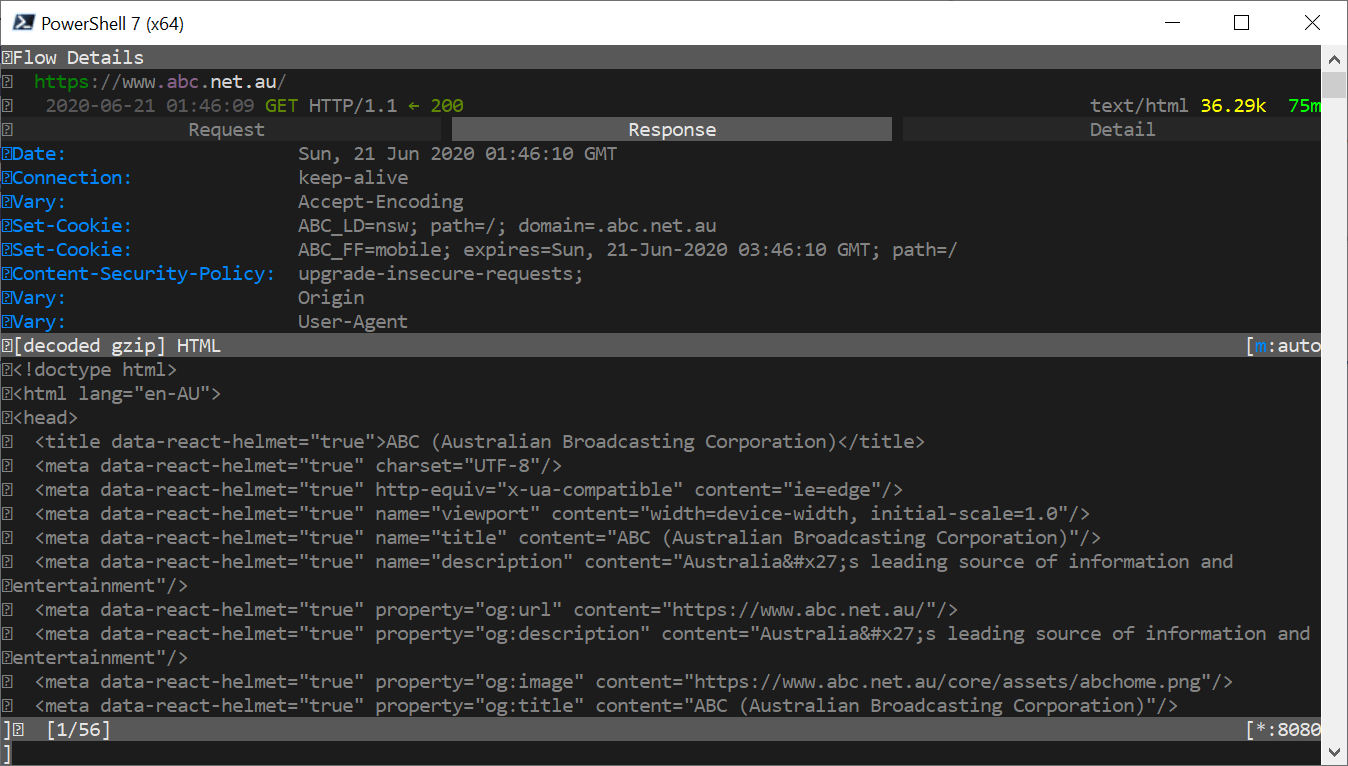
If you go back to your browser now and refresh the abc website - the warning should be gone!
And, if you now view the mitm terminal window you started earlier, you will see the unencrypted contents of the communications. (note the HTTPS)

And, if you select one of the lines, you can dive into the actual request and response data - wooohooo jiggle
When this won’t work
While this strategy does work for many apps, some applications include some additional security by using Certificate Pinning
Essentially, what this does is explicitly tell the application which certificates it can trust, even if the operating system says its okay.
I still need to explore options for working around this, but it will very likely mean Jail Breaking iOS.
For a quick reference, here are some applications I tried.
Apps that worked
- Safari
- Weather
- Photos
- Gmail
Apps that didn’t work
- App Store
How do I undo all this?
Turn off the proxy
To get your phone back to normal working order.
- Navigate to
Settings/Wi-Fiand tap on the blue circledion the right. - Scroll to the bottom, and tap on
Configure Proxy - Select
Offand save
Uninstall a custom profile
- Navigate to
Settings/General/Profiles - Tap the mitmproxy profile
- Tap the
Remove Profilebutton and follow the prompts
Removing the profile also removes the certificate settings - so you’re done.